Thursday, August 13, 2009

Adding a Description for SharePoint Designer Workflow

I have seen this question in many places “How to add description for a SharePoint Designer Workflow?” I had the same requirement; googling does not give me the result to achieve the same :-). See the image of a sample workflow generated by SharePoint Designer.


Unfortunately, SharePoint Designer does not provide an option for adding workflow description. I have looked at the files which is generated by designer, but unsuccessful. See the files generated by a SharePoint Designer Workflow


The finally I decided to write a piece of code using SharePoint Object Model to achieve the same.

private void AddWorkflowDescription(string siteURL, string listName, string workflowName, string workflowDesc)
{
using (SPSite site = new SPSite(siteURL))
{
using (SPWeb web = site.OpenWeb())
{
SPList _linksList = web.Lists[listName];

foreach (SPWorkflowAssociation _wfAssoc in _linksList.WorkflowAssociations)
{
if (_wfAssoc.Name.ToLower().Equals(workflowName))
{
_wfAssoc.Description = workflowDesc;
_linksList.UpdateWorkflowAssociation(_wfAssoc);
break;
}
}
}
}
}


Feature Activated Code

public override void FeatureActivated(SPFeatureReceiverProperties properties)
{
string _siteURL = "http://mossserver:4545/sites/Demo/";
string _listName = "Links";
string _workflowName = "workflow 1";
string _workflowDesc = "Workflow Descriptiopn updated by code";
AddWorkflowDescription(_siteURL, _listName, _workflowName, _workflowDesc);
}


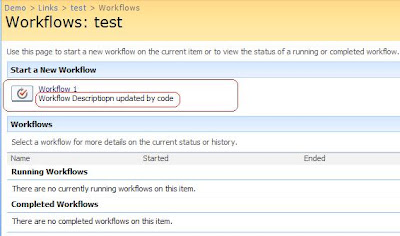
I have added this code in my “Feature Activated” event. The following image shows a SharePoint designer workflow with description which is generated by the above code.


Note:
If you just want to run this code only once then create a Console Application / Windows application to execute the above code.

Friday, August 7, 2009

Flash Tag Cloud in SharePoint using jQuery

This post uses WP-Cumulus plugin and SharePoint Content Editor Web Part to display Tags or any SharePoint list data in 3D format. The data from SharePoint list has been queried using jQuery. See the below screens which shows Tag Cloud in a SharePoint Page.


See the Tag Cloud in action here.

WP-Cumulus
WP-Cumulus allows you to display your site's tags, categories or both using a Flash movie that rotates them in 3D. There are different configuration options available like changing the color, style etc

For more information refer the following link (download)
http://wordpress.org/extend/plugins/wp-cumulus/

jQuery
jQuery is a lightweight JavaScript library that emphasizes interaction between JavaScript and HTML. Refer the interesting post from Jan Tielens to query SharePoint list data using jQuery.
For more information refer the following link

Here the Steps to create Tag Cloud using SharePoint list data with the use of jQuery.

Upload WP-Cumulus Files

You can use “Shared Documents” or create a new Document Library to hold the necessary files. I have created a new Document Library called “Tag Cloud” to hold the Tag Cloud related files. Download the WP-Cumulus from the above specified link, I have used version - 1.21. Extract the files and upload “swfobject.js” and “tagcloud.swf” files to the document library.


Creating a SharePoint list for holding Tag details

Create a SharePoint list with the following fields. You can see the list “Tags” with sample data in first screen.

Field Name - Type - Description

Tags - Single Line of Text - This field holds the Tag name
Link - Single Line of Text - This field points to the Tag Link
Style - Single Line of Text - This field holds a style number

Adding Content Editor Web part

Open your page (where you want to display Tag Cloud) in Edit Mode (Site Actions --> Edit Page), add Content Editor Web Part (CEWP) to any one Web part Zone. Copy and Paste the following code to the Source Editor of CEWP.

Note:

If you want the Tag Cloud in all other pages then add CEWP to the master page)
Script


<script type="text/javascript" src="http://jqueryjs.googlecode.com/files/jquery-1.3.2.min.js" > </script>

<script type="text/javascript" src="/sites/Demo/Tag%20Cloud/swfobject.js"></script>


<div id="flashcontent">This will be shown to users with no Flash or Javascript.</div>


<script type="text/javascript">

var tags = "";

$(document).ready(function() {

var soapEnv =

"<soapenv:Envelope xmlns:soapenv='http://schemas.xmlsoap.org/soap/envelope/'> \

<soapenv:Body> \

<GetListItems xmlns='http://schemas.microsoft.com/sharepoint/soap/'> \

<listName>Tags</listName> \

<viewFields> \

<ViewFields> \

<FieldRef Name='Tag' /> \

<FieldRef Name='Link' /> \

<FieldRef Name='Style' /> \

</ViewFields> \

</viewFields> \

</GetListItems> \

</soapenv:Body> \

</soapenv:Envelope>";


$.ajax({

url: "_vti_bin/lists.asmx",

type: "POST",

dataType: "xml",

data: soapEnv,

complete: processResult,

contentType: "text/xml; charset=\"utf-8\""

});

});


function processResult(xData, status) {

$(xData.responseXML).find("z\\:row").each(function() {


tags += "<a href='" + $(this).attr("ows_Link") + "' style='" + $(this).attr("ows_Style") + "'>" + $(this).attr("ows_Tag") + "</a>";

});


var tagDetails = "<tags>" + tags + "</tags>";


var so = new SWFObject("/sites/Demo/Tag%20Cloud/tagcloud.swf", "tagcloud", "230", "200", "7", "#ffffff");

// uncomment next line to enable transparency

//so.addParam("wmode", "transparent");

so.addVariable("tcolor", "0x111111");

so.addVariable("mode", "tags");

so.addVariable("distr", "true");

so.addVariable("tspeed", "100");

so.addVariable("tagcloud", tagDetails);

so.write("flashcontent");


}

</script>

Note:

Replace the text marked in red with your respective document library relative path, list name and field names.

A dynamic Tag Cloud is ready, now you can add/ modify the “Tags” list data and it will be reflected in Tag Cloud.

Wednesday, August 5, 2009

Creating Custom Permissions in SharePoint

SharePoint provides simple UI to create custom permissions or customize existing permissions. This post will guide you to create a permission level which allows a user to create, update items in list but not allow deleting the same.
Follow the below steps to create a new permission level

Navigate to Site Actions --> Site Settings --> Advanced Permissions

This page displays the complete list of user groups and their respective permission levels. Click on the group to add / remove associated permission levels


Go to Settings --> Permission Levels to create a new permission / customize an existing one.


To customize the existing permission level, click on the permission level and check / un-check the permission check boxes to match your requirement.


I am going to create a new permission level “Low Contribute”, which allow a user to add, update an item but not delete. A little bit of customization to the Contribute permission level will give us the desired functionality. Click on “Copy Permission Level” which will copy the permission level, give a name to this permission level (“Low Contribute”).


Create the new permission level by un-checking “Delete Items” and “Delete Versions” from “List Permissions” section. The following screen shows a user with “Low Contribute” permission.


Note: The security trimmed menu does not have the Delete option.

Monday, August 3, 2009

Adding Custom New Icon using CEWP in SharePoint

This post uses JavaScript with Content Editor Web Part to add custom new icon.

Use the following approach if your site is not a multilingual one. To achieve the same in multilingual sites, a more dynamic approach is required. New Icon can be found in images of 1033 (English) folder. Each language will have a respective new icon.I have created four icons for this post and placed in 12 Hive\Template\Layouts\Images\Icons.


Step – 1: Add a Content Editor Web Part (CEWP) to your page, where you want to display the custom New Icon. I have used my document library landing page (AllItems.aspx) for this purpose.

Note:
This will show the custom New Icon for that particular page, place the CEWP to your master page if you want to apply custom icon for other pages which references the master page.

Step – 2: Open CEWP Tool Pane, click on “Source Editor”. Place the following script in Source Editor.


<script language="JavaScript">
_spBodyOnLoadFunctionNames.push("ShowCustomNewIcons");

function ShowCustomNewIcons()
{
//Custom New Icon Image path
var newIcon = '_layouts/images/icons/new1.jpg';
var fields,i;
fields = document.getElementsByTagName('IMG');
for( i = 0; i < fields.length; i ++ )
{
var imagesrc = fields[i].getAttribute('SRC');
if(imagesrc.indexOf("new.gif") != -1)
{
fields[i].src = newIcon;
}
}
}
</script>


Once the script added, you can see the custom icon will be shown on the new items instead of the OOB New Icon.


Using STSADM to set the duration of New Icon in SharePoint

The duration of the New Icon can be modified using STSADM utility. Use “Days-to-show-new-icon” property to set the duration in days. If the duration is set to “0” (zero) then the new icon will not be displayed. This is the better way to hide the New Icon.


Note:
The default duration of days is “2”.

Using STSADM

Use the following STSADM command to set the New Icon display duration to “5” days.

stsadm.exe
-o setproperty
-pn days-to-show-new-icon
-pv 5
-url http://mosssiteUrl


TechNet Reference:
http://technet.microsoft.com/en-us/library/cc287681.aspx


Saturday, August 1, 2009

My Fourth SharePoint Article in Codeproject.com

My Fourth Article published in Codeproject.com

Title : SharePoint Tasks Popup using JavaScript API

Description :
This article uses SharePoint’s Content Editor Web part (CEWP) with Darren’s JavaScript API to display the tasks for current logged in user. JavaScript API is used to query the SharePoint Task list and the tasks for the current user will be displayed in the CEWP. See the screen below