Friday, January 18, 2008

Displaying Pdf document in SharePoint Page

Pdf documents can be displayed in SharePoint site with the use of “Content Editor Web part”. To know more about "Content Editor Web part", I suggest you to read this post, where you will get to know about playing a video in SharePoint site.

Add a “Content Editor Web part” to your SharePoint page, Click on the “Open the Tool Pane”, click on “Source Editor” to place the HTML source.
Place the following piece of code in to the Source Editor


In the above code, “src” points to a source location, the location can be a HTTP or a UNC path. I’ve stored my Pdf document in my document library and used the Http location of my Pdf file. Also Set the Height and Width properties and click on “Ok”.


The above image shows the embedded Pdf document to a SharePoint page.

Wednesday, January 16, 2008

Calculated column to display month name from a date

I was haing a requirement to display the month name from the selected date like January, February etc. I have created a calculated column and used a formula to display the month name.

Create a custom SharePoint list and a date column, a calculated column to it and other columns to it. For the demonstration purpose, I have created a list “Employee List”, with “Emp ID”, “Employee Name”, “Joining Date”, and “Month Calculated” columns. Here “Month Calculated” is the Calculated Column.


Above image shows the column details of "Employee List".

In the Calculated Column, use the following formula to get the month name from the “Joining Date” column.


=TEXT([Joining Date],"MMMM") -- To Display “January”, “February”, etc
Or
=TEXT([Joining Date],"MMM") -- To Display “Jan”, “Feb”, etc


Above image shows the “Month Calculated” calculated column.


Once the columns added to the List, Add new items by clicking “New”.


After selecting the “Joining Date” Click ok. Now the calculated column will display the month name for the selected “Joining Date”.


Monday, January 7, 2008

Registering Assembly to GAC via Code

Registering Assembly to GAC via Code

As we know to register an assembly toGlobal Assembly Cache, the assembly must be strong named. This strong name is used to prevent spoofing of your code. Use the “gacutil.exe” to install the assembly to the GAC.


Example


gacutil /i MyAssembly.dll


The above command will installs the “MyAssembly.dll” in to the GAC.
See the following code snippet to do the above stuff by C# code.

try
{
string assemblyName = “MyAssembly.dll”;

ProcessStartInfo pStartInfo = new ProcessStartInfo();

//specify gacutil.exe whith which to start the process
pStartInfo.FileName = "gacutil.exe";
pStartInfo.Arguments = string.Format("/i {0}", assemblyName);
pStartInfo.UseShellExecute = false;

//start the process
Process process = Process.Start(pStartInfo);

//wait till the process completes
process.WaitForExit();
}
catch (Exception e)
{
MessageBox.Show(string.Format
("Error registering the assembly :
'{0}'.\n{1}"
, assemblyName, e.Message),
"GAC Installation Error");
}


The “UseShellExecute” property indicates whether to use the operating system shell to start the process. The default is “true”. Set this property to “false” – The process is created directly from the executable file.

Friday, December 28, 2007

Using XSL to display XML data into a human-readable format

Abstract

When we open our XML document on browser, we will notice only the elements of that XML document. If we want to display our XML data in a table like format then we need to know about XSL.

HTML

HTML contains the predefined tags like <TABLE>, <H1>, etc. This will be well understood by the browser. And the browser also knows how to display these tags.

XML & XSL

The most recent version of XSLT is XSLT 2.0.

XML does not use any predefined tags i.e., we can use any tag-name we like. And these names are not well understood. The browser doesn’t know how to display these tags. Now the XSL plays its role, it stands for “Extensible Stylesheet Language”, which describes how the XML document should be displayed on the browser.Have a look at the following XML Document, which describes about Employees. It contains reference to the XSL file (Employee.xsl).

Employee.xml:


Now we need to create a XSL file, by name “Employee.xsl”.

Employee.xsl:


In the above code, xmlns:xsl="http://www.w3.org/1999/XSL/Transform" points to the official W3C XSLT namespace. The is used to build a template, and match attribute is used to associate a template with an XML element. Use “/” to associate the whole XML document.

which associates the whole XML document to the template. The used to select every XML element of a specified node-set: in our example “Employees/Employee”. The used to extract the value of an XML element. It is a simple XSL style sheet, there are other elements of XSL (if, choose, sort…), which are also very useful for transformation.Now the browser will nicely transform the XML document to XHTML.Open the “Employee.xml” in your browser.


XML data will be displayed in a table format. XSL also used to transform XML documents into some other formats.

Thursday, December 20, 2007

Silverlight Slide Show in SharePoint Page

It is very easy to display Silverlight powered slide show in SharePoint using Slide.Show. Vertigo Software has released this full-featured interactive open source Silverlight 1.0 control for publishing photo slides on the web.

Download Slide.Show from Codeplex.

I have used this Slide.Show to display silverlight powered slide show in my SharePoint page.


I have created a basic html page to display this Silverlight powered slide show and used a “Page Viewer WebPart” to display the slide show in my home page. You can refer this Quick Start Guide for configuration.

Created a folder in my document library to store HTML and other files and also created two xml files Configuration.xml and Data.xml in the same location.


Use Data.xml to create albums and slides. I have used an Image Library to display these images. You can see buttons for displaying the Album list and also to display the slides in full screen.


Slide.Show supports 300 configurable options. Now it is very easy to play with Silverlight with the use of Slide.Show.

Friday, December 14, 2007

Creating Wiki Site in SharePoint

A Wiki site is a collection of web pages, which allows users to easily add or edit content on the web. Wiki site contains collaboration of works from different authors. It is very easy and straightforward to create a Wiki site in SharePoint.

Creating Wiki Site

Create a site in SharePoint using the “Wiki Site” template from the Collaboration tab. To do this, go to Site Actions --> Create --> Sites and Workspaces. Fill Title, Description, and URL name input boxes and select the “Wiki Site” template.


Once the Create button is clicked, it will create a Wiki site with default pages in it. The Home page will contains the welcome message and some information about the Wiki and also it contains details about how Wiki used in business environment.


A new “Wiki pages” library will be created when you create a Wiki site. It also contains one more page by name “How to use this wiki site”. This page has the detailed description about the creation and management of Wiki pages.


The Wiki site provides WYSWYG (what you see is what you get) editing. Use the Edit button at the top of the page to edit the page. You will get the entire “Rich Text box” editing features to format the text.

To link to another page in this Wiki site, enclose the name of the site in double brackets on the edit form.

Ex: [[MOSS]] --> this will link to the page moss page.

Use the pipe “” symbol after the page name to display the link in some other text than the page name.

Ex: [[SPDesignerSharepoint Designer]]


Now, click the Edit button at the top of the Home page.


I have given links to two pages namely “MOSS” and “SPDesigner”, and note I’ve used “” to display the page SPDesigner as “Sharepoint Designer”. After adding the above text, click “OK” button, this will bring the below page.


The two sites “MOSS” and “Sharepoint Designer” are underlined, which shows these pages are not exist. Click on the MOSS link, this will create a new Wiki page by name “MOSS” in edit mode.


Add some more information to this “MOSS” page. I have added one more link in this page to go back to home page. Create “SPDesigner” page as we created “MOSS” page.

There are some other options “History” and “Incoming Links” available at the top of the page.


History

Use History to restore a previous version of a page. Each page will contains version history. If you need to restore to previous version, click History at the top of the page.


As shown in the above image, select the version which you want to restore and click “Restore this version” in the top toolbar.

Incoming Links

This will display the page which links to the current page.


These are the pages “MOSS” and “SPDesigner” has the links to the “Home” page.

Wednesday, December 12, 2007

Displaying charts in SharePoint using Excel Services

A chart displays data in a visually appealing way. By using charts, it is very easy to understand and compare data. We can use Office Excel 2007 for creating charts and Excel Services of MOSS to display it in SharePoint.


Excel Services

Excel Services is part of MOSS 2007. Excel Services has a server-side engine for loading Excel spreadsheets, calculating formulas and rendering their output as wide-reach HTML targeting the browser.

Open the Central Admin--> Operations --> Services on Server then Start the Excel Calculation Service on the server if it is stopped.


Excel Web Access

Excel Web Access is a webpart that displays data and charts from excel workbook. It has similar look like office excel workbook.


Creating a Document Library

Create a Document Library in your MOSS Site. Go to Site Actions --> Create --> Document Library to create document library in your SharePoint Site. This document library will be useful to publish our Excel spread sheets.


Trusted File Location

Excel Services opens Excel workbooks that are stored in trusted file locations only. Trusted File location is a SharePoint Document Library, a UNC path, or an HTTP site that is configured as trusted repository for excel workbooks.

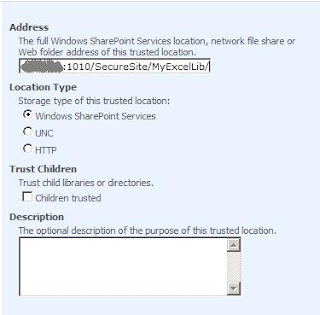
Add this newly created excel document library as a trusted file location for storing excel workbooks. To do this, open the Shared Services Administration Site then click the “Trusted File Locations” link from Excel Services Settings. Now, click “Add Trusted File Location” and add our document library as a trusted location.


Creating Charts Using Office Excel 2007

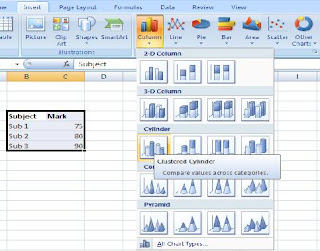
We can use Office Excel 2007 for creating different kinds of charts like Column, Pie, Bar, Area, Scatter etc. See the following image which shows the different chart types available with Office Excel 2007.


In this sample, I’m going to create a Column Chart by using following sample data.



To create Column Chart select the data and Click on Insert-->Column (Chart) and select your desired chart. See the following screen, I’ve selected Clustered cylinder.


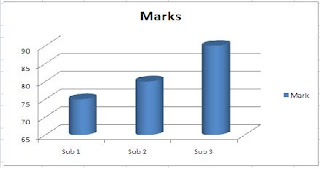
The below chart will be created once the chart type (Clustered Cylinder) is selected. And this chart will be named as “Chart 1”.


We are going to use Excel Web Access Webpart to display this particular Chart. It is also possible to display the Entire Workbook. Once the chart has been created, publish this workbook to the document library. From the Office menu click Publish-->Excel Services as shown in below image
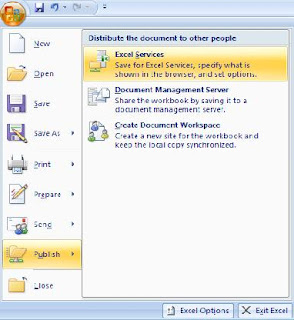


Click on that Excel Services, this will open a “Save As” popup dialog and enter the Document Library path to save this file the Library.
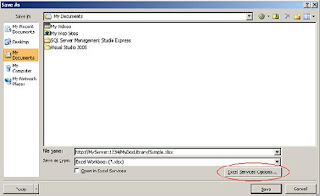


“Open in Excel Services” – Once the form is saved, Excel Services will open the excel workbook in a new browser.

We can add some more options like showing only selected sheets, named items, or adding parameters, etc., with the use of “Excel Services Options”. See the below image which shows the Excel Services Options.
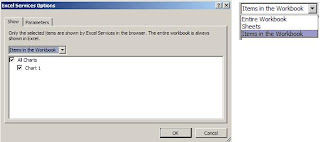


These are the different options available, here we can select the Entire Workbook, only selected sheets or any named item. In our sample, we are going to display only a Chart. Select the “Items in the Workbook”, this will show a list of named items, in our case we have only one item “Chart 1”. Check “Chart 1” from the list. Click “Ok” and save the excel workbook to the Document Library.

There is one more tab “Parameters” which can be used to pass parameters to excel services. Excel Services will create UI by using InfoPath at run time to get input for those parameters.

Now, Open your SharePoint site and add the “Excel Web Access WebPart” to your page.
If this WebPart is not in your list then activate the “Office SharePoint Server Enterprise Site Features” feature.

Once the WebPart is added to the page, Open the Tool pane, this tool pane contains different properties that will be helpful to display the workbook, part of workbook or an item in a workbook.
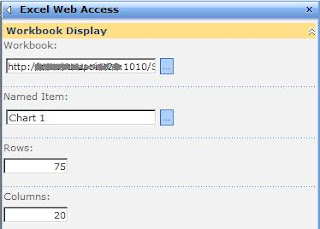


Browse and select the Workbook from the document library, enter “Chart 1” in Named Item property and enter other properties like rows, columns etc. Now, click ok, Excel services will render the chart. If the published workbook contains parameters then an InfoPath form will be displayed along with the chart. InfoPath form will be used to get input and the calculation service of excel will perform the calculation in server and render the results back to the browser.
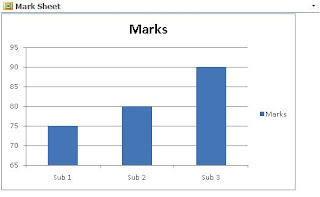


It is also possible to use Excel Web Services (EWS) hosted in SharePoint that provides several methods that can be used as an API to build custom applications based on Excel workbook.