Create an InfoPath form and add Business logic to it (If any).
Open Your Project (InfoPath) in Visual Studio. Open Tools à Form Options
In this “Form Options” Dialog, some properties need to be set.
1) Security and Trust
--> Select Full Trust (Browser enabled forms must have the “Full Trust” Security level.
--> Check Sign this form template (Create a new certificate by clicking “Create Certificate”.

2) Compatibility
Check the “Design a form template that can be opened in a browser or InfoPath” in Browser Compatibility section. Enter the SharePoint site URL to verify the compatibility.

After setting these properties click “Ok”. Check the “Design Checker”, it should not have errors.
Now go to Build à Publish in Visual Studio. This will open the below dialog.

Here, publish this InfoPath form to a network location. In my case I’ve published in C:\MySampleInfoPathForm.xsn

Click next and Publish to your network location. An “.xsn” file will be created which will have all the business logic in it. (No need to copy the business logic dll’s to server).
Now, Open the SharePoint Central Admin Site.
Go to “Application Management” --> Manage Form Templates

This will take us the following page

Click on Upload form template

Select your “.xsn” and click ‘Verify”. This will show a success message if the form is trusted. Otherwise, it will throw an error.
After the Verification click the Upload button to upload the InfoPath form as an Administrator approved template.
After successful upload, activate the form to your site collection. See the below screen

We are going to use this template as “Content Type” for a document library.
Go to that site, which you have activated this template. Create a Document Library.
Go to Settings of the Document Library.
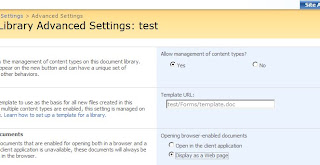
Settings --> Advanced Settings

1) Select “Allow Management of Content type” to Yes. (Default it is set to false)
2) Select “Display as a Web page” then click OK.
Now, In Document Library Settings page click on “Add from existing content type”

Select your content type (see the below screen)

Click on Add then OK. Now this Content type (MySampleInfopathForm) has been added to the Document Library.

Click that Content type; InfoPath Form Services will display the InfoPath form in a browser.


No comments:
Post a Comment