Showing posts with label SharePoint Designer. Show all posts

Thursday, August 13, 2009

Adding a Description for SharePoint Designer Workflow

I have seen this question in many places “How to add description for a SharePoint Designer Workflow?” I had the same requirement; googling does not give me the result to achieve the same :-). See the image of a sample workflow generated by SharePoint Designer.


Unfortunately, SharePoint Designer does not provide an option for adding workflow description. I have looked at the files which is generated by designer, but unsuccessful. See the files generated by a SharePoint Designer Workflow


The finally I decided to write a piece of code using SharePoint Object Model to achieve the same.

private void AddWorkflowDescription(string siteURL, string listName, string workflowName, string workflowDesc)
{
using (SPSite site = new SPSite(siteURL))
{
using (SPWeb web = site.OpenWeb())
{
SPList _linksList = web.Lists[listName];

foreach (SPWorkflowAssociation _wfAssoc in _linksList.WorkflowAssociations)
{
if (_wfAssoc.Name.ToLower().Equals(workflowName))
{
_wfAssoc.Description = workflowDesc;
_linksList.UpdateWorkflowAssociation(_wfAssoc);
break;
}
}
}
}
}


Feature Activated Code

public override void FeatureActivated(SPFeatureReceiverProperties properties)
{
string _siteURL = "http://mossserver:4545/sites/Demo/";
string _listName = "Links";
string _workflowName = "workflow 1";
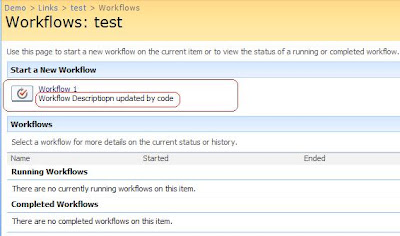
string _workflowDesc = "Workflow Descriptiopn updated by code";
AddWorkflowDescription(_siteURL, _listName, _workflowName, _workflowDesc);
}


I have added this code in my “Feature Activated” event. The following image shows a SharePoint designer workflow with description which is generated by the above code.


Note:
If you just want to run this code only once then create a Console Application / Windows application to execute the above code.

Wednesday, July 29, 2009

SharePoint Custom Page Layout – Web Parts getting added twice

I have used SharePoint Designer to create a custom page layout and added few custom web parts (drag-drop using SPD).

The Page Layout has been deployed using a Feature. After deployment, The Page Layout has web parts as expected and the issue is, when a page is created using the custom Page Layout, each web part is added twice.

I have tried different approaches to remove the web parts unsuccessfully. Finally removed all web parts (which I have added using SharePoint Designer) and used “
AllUsersWebPart” element to add custom web parts in Feature. It worked like a charm!

Monday, July 27, 2009

Useful Tools for SharePoint

The following are the tools which are very frequently used in SharePoint Projects.

SharePoint Designer

SharePoint Designer is a WYSIWYG HTML editor and web design application from Microsoft exclusively for SharePoint sites.

Download link: http://www.microsoft.com/DOWNLOADS/details.aspx?FamilyID=baa3ad86-bfc1-4bd4-9812-d9e710d44f42&displaylang=en

U2U CAML Builder

A tool for creating and executing CAML queries

Download link: http://www.u2u.be/res/Tools/CamlQueryBuilder.aspx

SP Dispose Check

A tool for writing safe code using SharePoint Object Model to prevent memory leaks

Download link: http://code.msdn.microsoft.com/SPDisposeCheck

WSPBuilder

A tool for creating SharePoint Solution Package (WSP) WSS 3.0 & MOSS 2007

Download link: http://www.codeplex.com/wspbuilder

STSDEV

A tool for creating easy deployable solution

Download link: http://www.codeplex.com/stsdev

SharePoint Manager 2007

It a SharePoint object model explorer tool, enables you to browse every site on the local farm and view every property.

Download link: http://www.codeplex.com/spm

WSS/MOSS Log file reader

A tool to View, search and filter SharePoint ULS log files directly from within Central Administration.

Download link: http://www.codeplex.com/wssmosslogfilereader


SharePoint Logging Spy

A tool to allow real time diagnostics of multiple servers in a SharePoint

Download link: http://www.codeplex.com/sharepointloggingspy

SharePoint Test Data Population Tool

A tool for capacity planning and performance testing that populates data for testing SharePoint deployments

Download link: http://www.codeplex.com/sptdatapop

AD Explorer

It is an advanced Active Directory (AD) viewer and editor which allows manipulation of AD objects

Download link: http://technet.microsoft.com/en-us/sysinternals/bb963907.aspx

IE Developer Toolbar

A tool that aims to aid in design and debugging of web pages

Download link: http://www.microsoft.com/downloads/details.aspx?FamilyId=E59C3964-672D-4511-BB3E-2D5E1DB91038&displaylang=en

Note: “Internet Explorer 8” includes the features of IE Developer Toolbar built in, instead of a separate product; known as Developer Tools rather than Developer Toolbar.

Reflector

A tool for disassemble Assemblies

Download link: http://www.red-gate.com/products/reflector

GhostDoc

A tool that helps developers writing XML documentation comments

Download link: http://www.roland-weigelt.de/ghostdoc

Resource Refactoring

A tool to extract hard coded strings from the code to resource files

Download link: http://www.codeplex.com/ResourceRefactoring

Fiddler

It is a Web Debugging Proxy which logs all HTTP(S) traffic between your computer and the Internet.

Download link: http://www.fiddlertool.com/

Saturday, February 21, 2009

Customizing SharePoint Blog Posts Web Part

Description

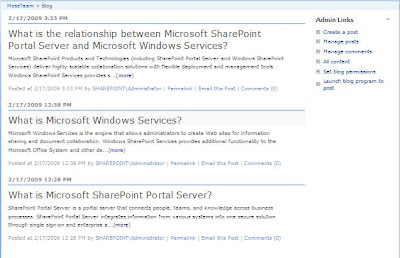
The OOTB posts web part displays complete posts in Home Page (default.aspx) of Blog Site. In this post, the Posts web part is customized to display only 250 characters from each post and a “more” link to the actual blog post instead of displaying complete Blog post in Home Page.

Before Customization

The Posts “ListViewWebPart” displays complete posts in home page.


After Customization

See the below screen, after the customization of Posts Web Part using SharePoint Designer.


Approach

Below the approach followed to display 250 characters blog post summary.

1) Convert Posts web part to XSD Data View using SharePoint Designer (SPD)
2) customize the XSL to display 250 characters summary and a “more” link to the actual blog post
3) Create a new Web Part from Customized Post web part and use it in other blog site

The following explains in-detail about the approach.
Creating XSD Data View

Use SharePoint Designer to convert the default list view web part (Posts) to XSD Data View. Open the Blog’s Home Page in your SharePoint Designer. Once the page is opened Right Click the List View Posts web part and select “Convert to XSD Data View”. See the below screen.
Customizing the XSD Data View

The Body column of the Posts list holds the complete summary text. The DataFormWebPart generated by SPD points the list by using the ListID. ListID is nothing but the GUID, which will change server to server. so use ListName instead of ListID to use this web part in blog site of any server.

Parameters Generated by SPD

After Change


The “removeHtmlTags” template of XSL used to strip the HTML text from the summary text. See the below screens which shows the XSL customizations.

removeHtmlTags” Template Definition

Call “removeHtmlTags” for getting Pure Text

Replace the following section


by


Now the customizations have been done. Export posts web part and use it in other Blog sites by uploading it to Web Part Gallery.


Friday, April 4, 2008

Page Hit Counter in SharePoint

You would have seen many sites displaying page hit counters. To display this in SharePoint page, insert the “Hit Counter” web component from SharePoint Designer.

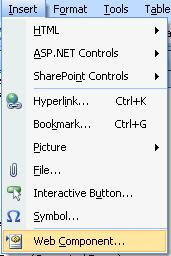
Open your site or your sites Master page to insert this component. For the demonstration purpose, I’ve use my default.aspx to insert the “Hit Counter” component. Once the page is opened in SharePoint Designer, place the cursor where you want to insert the hit counter. Go to Insert --> Web Component.


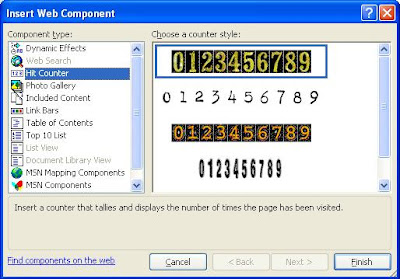
Click on the Web Component, this will display the available web components. You can find different types of other components readily available.


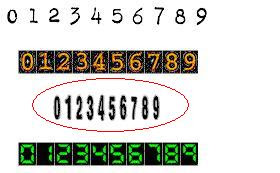
Click on the Hit Counter component, this will display different counter styles. Select any one style from the list. I have selected the below marked style.


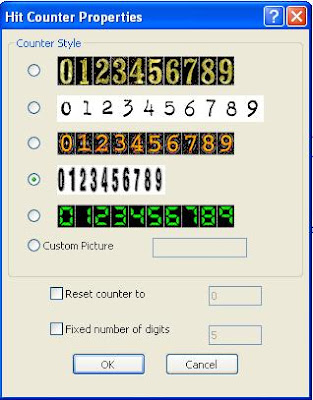
Click on “Finish”, this will open the below Hit Counter Properties window.


You can even create your own Hit Counter. Use “Reset counter to” to reset the counter from a given number. To display fixed number of digits use “Fixed number of digits” property. Click on “Ok”, the hit counter will be inserted to your page. The below code will be inserted in your page to display the counter.


Now, preview your page from SharePoint Designer / a Web browser. You can see the Hit Counter incremented for each hit.


You can see the Hit Counter increments for each hit.