Thursday, November 29, 2007

Displaying Custom Icon in Document Library

It’s easy to display custom icon for documents in the Document Library. By default if a file extension is not know to SharePoint (doesn’t has an entry in DOCICON.xml) then it will display a default icon “ICGEN.GIF”.

Instead of displaying the Default Icon in the document library, I want to display a custom icon. To do this, we should know about “DOCICON.xml” file. This file resides in “Local_Drive:\Program Files\Common Files\Microsoft Shared\Web Server Extensions\12\TEMPLATE\XML “. This file defines mapping between each file extension and its icon.

You can even define your own file extension and associate a custom icon to that file extension. It is also possible to change already defined icons. Changes to the “DOCICON.xml” will affect all site definitions under the front-end web server. So the changes should be made with extreme caution.

See the below document library which displays a default icon.


To change the default icon to a custom icon

1) Create a 16x16 icon in “Local_Drive:\Program Files\Common Files\Microsoft

Shared\Web Server Extensions\12\TEMPLATE\IMAGES” location

2) Take a copy of “DOCICON.xml” – Take a backup of this file


3) Open “DOCICON.xml” and navgaete to the “Default” node and replace the “icgen.gif”
by your custom icon name.


4) Reset IIS.

Now you can see the default icon is replaced by the custom icon.


Monday, November 26, 2007

Publishing InfoPath Form

InfoPath form services will throw an error if the InfoPath form template is not properly published. Follow these steps to publish an InfoPath form (.xsn) and use this template in Form Services of MOSS 2007.

Create an InfoPath form and add Business logic to it (If any).

Open Your Project (InfoPath) in Visual Studio. Open Tools à Form Options

In this “Form Options” Dialog, some properties need to be set.

1) Security and Trust

--> Select Full Trust (Browser enabled forms must have the “Full Trust” Security level.

--> Check Sign this form template (Create a new certificate by clicking “Create Certificate”.


2) Compatibility

Check the “Design a form template that can be opened in a browser or InfoPath” in Browser Compatibility section. Enter the SharePoint site URL to verify the compatibility.


After setting these properties click “Ok”. Check the “Design Checker”, it should not have errors.

Now go to Build à Publish in Visual Studio. This will open the below dialog.


Here, publish this InfoPath form to a network location. In my case I’ve published in C:\MySampleInfoPathForm.xsn


Click next and Publish to your network location. An “.xsn” file will be created which will have all the business logic in it. (No need to copy the business logic dll’s to server).

Now, Open the SharePoint Central Admin Site.

Go to “Application Management” --> Manage Form Templates


This will take us the following page


Click on Upload form template


Select your “.xsn” and click ‘Verify”. This will show a success message if the form is trusted. Otherwise, it will throw an error.

After the Verification click the Upload button to upload the InfoPath form as an Administrator approved template.

After successful upload, activate the form to your site collection. See the below screen


We are going to use this template as “Content Type” for a document library.

Go to that site, which you have activated this template. Create a Document Library.
Go to Settings of the Document Library.

Settings --> Advanced Settings


1) Select “Allow Management of Content type” to Yes. (Default it is set to false)
2) Select “Display as a Web page” then click OK.

Now, In Document Library Settings page click on “Add from existing content type”


Select your content type (see the below screen)


Click on Add then OK. Now this Content type (MySampleInfopathForm) has been added to the Document Library.


Click that Content type; InfoPath Form Services will display the InfoPath form in a browser.

Monday, November 19, 2007

Inline Video in SharePoint

Abstract

This article provides the information to add inline video to a SharePoint Site. We can achieve this by using Built-in “Content Editor WebPart”.

Content Editor WebPart

Content Editor Web Part is intended for adding HTML content to a Web Part Page, which may include hyperlinks.

It is possible to add content to the Content Editor WebPart in three ways

Rich Text Editor:


Use the Rich Text Editor to create the formatted content without the prior knowledge of HTML.
There are different toolbars available in this editor to format the content.

Source Editor:


Use this Source Editor to add or modify the HTML source code. This Source Editor is a plain text editor and it is intended for users who are familiar with HTML syntax.

Content Link:


Use this Content Link to link to the existing content by entering a hyperlink to a text file that contains a HTML source code. HTTP or HTTPS are the two valid hyperlink protocols that you can use to link to the file.

The Following image shows the Content Editor Tool Pane.


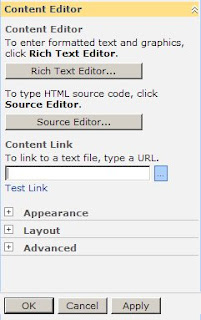
Adding a Video File To SharePoint Site

It is Simple and straight forward to add a video file. Add a Video file to your library or to a location, which can be accessed by an UNC path. Content Editor WebPart uses this source location to display the video.

In this following scenario I’ve a document library “Sample Documents”, which I’ve used to store my sample video clip.


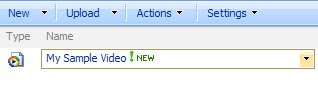
Here, “My Sample Video” is the video file, which has been uploaded to my document library “Sample Documents”.

Now, Add Content Editor WebPart to your page. In this webpart we are going to add few lines of HTML source to embed the video file “My Sample Video”.

HTML Source


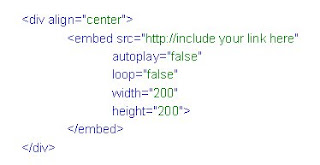
Details about the properties of embed tag.

src – source location

autoplay – If autoplay set to true, the video will be played immediately upon opening the SharePoint site. If this is set to false, the user has to manually click play to play the video.

loop – If loop is set to true, the video will be played over again after the end. If this is set to false, only once the video will be played.

height, width – you can use these properties to adjust the height and width respectively. Next, Get the location of your video. To get this location, go to your library and right click the video file. Copy Shortcut will give the location of your file. Now place the location in src of embed tag.– If autoplay set to true, the video will be played immediately upon opening the SharePoint site. If this is set to false, the user has to manually click play to play the video.

loop – If loop is set to true, the video will be played over again after the end. If this is set to false, only once the video will be played.

height, width – you can use these properties to adjust the height and width respectively. Next, Get the location of your video. To get this location, go to your library and right click the video file. Copy Shortcut will give the location of your file. Now place the location in src of embed tag.


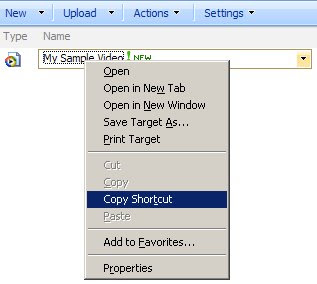
Once the above HTML source code is entered in to source editor, click on save button, this will embed the video in to your page.


With the help of Content Editor Webpart it is very easy to play the inline video in a SharePoint site.