Thursday, August 13, 2009

Adding a Description for SharePoint Designer Workflow

I have seen this question in many places “How to add description for a SharePoint Designer Workflow?” I had the same requirement; googling does not give me the result to achieve the same :-). See the image of a sample workflow generated by SharePoint Designer.


Unfortunately, SharePoint Designer does not provide an option for adding workflow description. I have looked at the files which is generated by designer, but unsuccessful. See the files generated by a SharePoint Designer Workflow


The finally I decided to write a piece of code using SharePoint Object Model to achieve the same.

private void AddWorkflowDescription(string siteURL, string listName, string workflowName, string workflowDesc)
{
using (SPSite site = new SPSite(siteURL))
{
using (SPWeb web = site.OpenWeb())
{
SPList _linksList = web.Lists[listName];

foreach (SPWorkflowAssociation _wfAssoc in _linksList.WorkflowAssociations)
{
if (_wfAssoc.Name.ToLower().Equals(workflowName))
{
_wfAssoc.Description = workflowDesc;
_linksList.UpdateWorkflowAssociation(_wfAssoc);
break;
}
}
}
}
}


Feature Activated Code

public override void FeatureActivated(SPFeatureReceiverProperties properties)
{
string _siteURL = "http://mossserver:4545/sites/Demo/";
string _listName = "Links";
string _workflowName = "workflow 1";
string _workflowDesc = "Workflow Descriptiopn updated by code";
AddWorkflowDescription(_siteURL, _listName, _workflowName, _workflowDesc);
}


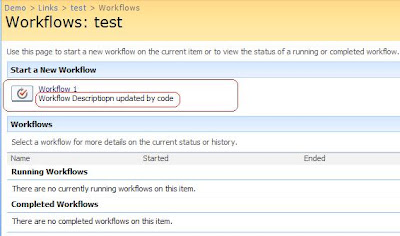
I have added this code in my “Feature Activated” event. The following image shows a SharePoint designer workflow with description which is generated by the above code.


Note:
If you just want to run this code only once then create a Console Application / Windows application to execute the above code.

Friday, August 7, 2009

Flash Tag Cloud in SharePoint using jQuery

This post uses WP-Cumulus plugin and SharePoint Content Editor Web Part to display Tags or any SharePoint list data in 3D format. The data from SharePoint list has been queried using jQuery. See the below screens which shows Tag Cloud in a SharePoint Page.


See the Tag Cloud in action here.

WP-Cumulus
WP-Cumulus allows you to display your site's tags, categories or both using a Flash movie that rotates them in 3D. There are different configuration options available like changing the color, style etc

For more information refer the following link (download)
http://wordpress.org/extend/plugins/wp-cumulus/

jQuery
jQuery is a lightweight JavaScript library that emphasizes interaction between JavaScript and HTML. Refer the interesting post from Jan Tielens to query SharePoint list data using jQuery.
For more information refer the following link

Here the Steps to create Tag Cloud using SharePoint list data with the use of jQuery.

Upload WP-Cumulus Files

You can use “Shared Documents” or create a new Document Library to hold the necessary files. I have created a new Document Library called “Tag Cloud” to hold the Tag Cloud related files. Download the WP-Cumulus from the above specified link, I have used version - 1.21. Extract the files and upload “swfobject.js” and “tagcloud.swf” files to the document library.


Creating a SharePoint list for holding Tag details

Create a SharePoint list with the following fields. You can see the list “Tags” with sample data in first screen.

Field Name - Type - Description

Tags - Single Line of Text - This field holds the Tag name
Link - Single Line of Text - This field points to the Tag Link
Style - Single Line of Text - This field holds a style number

Adding Content Editor Web part

Open your page (where you want to display Tag Cloud) in Edit Mode (Site Actions --> Edit Page), add Content Editor Web Part (CEWP) to any one Web part Zone. Copy and Paste the following code to the Source Editor of CEWP.

Note:

If you want the Tag Cloud in all other pages then add CEWP to the master page)
Script


<script type="text/javascript" src="http://jqueryjs.googlecode.com/files/jquery-1.3.2.min.js" > </script>

<script type="text/javascript" src="/sites/Demo/Tag%20Cloud/swfobject.js"></script>


<div id="flashcontent">This will be shown to users with no Flash or Javascript.</div>


<script type="text/javascript">

var tags = "";

$(document).ready(function() {

var soapEnv =

"<soapenv:Envelope xmlns:soapenv='http://schemas.xmlsoap.org/soap/envelope/'> \

<soapenv:Body> \

<GetListItems xmlns='http://schemas.microsoft.com/sharepoint/soap/'> \

<listName>Tags</listName> \

<viewFields> \

<ViewFields> \

<FieldRef Name='Tag' /> \

<FieldRef Name='Link' /> \

<FieldRef Name='Style' /> \

</ViewFields> \

</viewFields> \

</GetListItems> \

</soapenv:Body> \

</soapenv:Envelope>";


$.ajax({

url: "_vti_bin/lists.asmx",

type: "POST",

dataType: "xml",

data: soapEnv,

complete: processResult,

contentType: "text/xml; charset=\"utf-8\""

});

});


function processResult(xData, status) {

$(xData.responseXML).find("z\\:row").each(function() {


tags += "<a href='" + $(this).attr("ows_Link") + "' style='" + $(this).attr("ows_Style") + "'>" + $(this).attr("ows_Tag") + "</a>";

});


var tagDetails = "<tags>" + tags + "</tags>";


var so = new SWFObject("/sites/Demo/Tag%20Cloud/tagcloud.swf", "tagcloud", "230", "200", "7", "#ffffff");

// uncomment next line to enable transparency

//so.addParam("wmode", "transparent");

so.addVariable("tcolor", "0x111111");

so.addVariable("mode", "tags");

so.addVariable("distr", "true");

so.addVariable("tspeed", "100");

so.addVariable("tagcloud", tagDetails);

so.write("flashcontent");


}

</script>

Note:

Replace the text marked in red with your respective document library relative path, list name and field names.

A dynamic Tag Cloud is ready, now you can add/ modify the “Tags” list data and it will be reflected in Tag Cloud.

Wednesday, August 5, 2009

Creating Custom Permissions in SharePoint

SharePoint provides simple UI to create custom permissions or customize existing permissions. This post will guide you to create a permission level which allows a user to create, update items in list but not allow deleting the same.
Follow the below steps to create a new permission level

Navigate to Site Actions --> Site Settings --> Advanced Permissions

This page displays the complete list of user groups and their respective permission levels. Click on the group to add / remove associated permission levels


Go to Settings --> Permission Levels to create a new permission / customize an existing one.


To customize the existing permission level, click on the permission level and check / un-check the permission check boxes to match your requirement.


I am going to create a new permission level “Low Contribute”, which allow a user to add, update an item but not delete. A little bit of customization to the Contribute permission level will give us the desired functionality. Click on “Copy Permission Level” which will copy the permission level, give a name to this permission level (“Low Contribute”).


Create the new permission level by un-checking “Delete Items” and “Delete Versions” from “List Permissions” section. The following screen shows a user with “Low Contribute” permission.


Note: The security trimmed menu does not have the Delete option.

Monday, August 3, 2009

Adding Custom New Icon using CEWP in SharePoint

This post uses JavaScript with Content Editor Web Part to add custom new icon.

Use the following approach if your site is not a multilingual one. To achieve the same in multilingual sites, a more dynamic approach is required. New Icon can be found in images of 1033 (English) folder. Each language will have a respective new icon.I have created four icons for this post and placed in 12 Hive\Template\Layouts\Images\Icons.


Step – 1: Add a Content Editor Web Part (CEWP) to your page, where you want to display the custom New Icon. I have used my document library landing page (AllItems.aspx) for this purpose.

Note:
This will show the custom New Icon for that particular page, place the CEWP to your master page if you want to apply custom icon for other pages which references the master page.

Step – 2: Open CEWP Tool Pane, click on “Source Editor”. Place the following script in Source Editor.


<script language="JavaScript">
_spBodyOnLoadFunctionNames.push("ShowCustomNewIcons");

function ShowCustomNewIcons()
{
//Custom New Icon Image path
var newIcon = '_layouts/images/icons/new1.jpg';
var fields,i;
fields = document.getElementsByTagName('IMG');
for( i = 0; i < fields.length; i ++ )
{
var imagesrc = fields[i].getAttribute('SRC');
if(imagesrc.indexOf("new.gif") != -1)
{
fields[i].src = newIcon;
}
}
}
</script>


Once the script added, you can see the custom icon will be shown on the new items instead of the OOB New Icon.


Using STSADM to set the duration of New Icon in SharePoint

The duration of the New Icon can be modified using STSADM utility. Use “Days-to-show-new-icon” property to set the duration in days. If the duration is set to “0” (zero) then the new icon will not be displayed. This is the better way to hide the New Icon.


Note:
The default duration of days is “2”.

Using STSADM

Use the following STSADM command to set the New Icon display duration to “5” days.

stsadm.exe
-o setproperty
-pn days-to-show-new-icon
-pv 5
-url http://mosssiteUrl


TechNet Reference:
http://technet.microsoft.com/en-us/library/cc287681.aspx


Saturday, August 1, 2009

My Fourth SharePoint Article in Codeproject.com

My Fourth Article published in Codeproject.com

Title : SharePoint Tasks Popup using JavaScript API

Description :
This article uses SharePoint’s Content Editor Web part (CEWP) with Darren’s JavaScript API to display the tasks for current logged in user. JavaScript API is used to query the SharePoint Task list and the tasks for the current user will be displayed in the CEWP. See the screen below

Thursday, July 30, 2009

Audience Targeting for Quick Launch using CEWP in SharePoint

I have seen this query in communities to hide the Quick Launch for a user group / particular audience. Most of the SharePoint developers know that Content Editor Web Part can be used to hide the Quick Launch bar.

To achieve the same, add the CEWP to the page, where you do not want to display the Quick Launch. Open Source Editor of CEWP and add the following

<style>
.ms-quicklaunch
{
display:none;
}
.ms-navframe
{
display: none;
}
</style>


Once the above <style> has been added, go to Advance Setting, set “Audience Targeting”. Set the group/audience to which you do not want to display the Quick Launch bar.

I have set the “Visitors” group in Audience Targeting. This setting will not allow the “Visitors” to see the Quick Launch bar.

I have a moss_user1 in Visitors Group and moss_user2 in Members Group.


The below screen hides the Quick Launch for moss_user1 (Visitors Group)


See the following screen, which shows the Quick Launch for moss_user2 (Members Group)


This approach will work for a single page, if you want the same to apply for all pages then add the CEWP to the master page with the above specified settings.

SharePoint Custom Search using FullTextSqlQuery – Format Hit Highlighted Summary

SharePoint search uses “HitHighlightedSummary “column for highlighting the search text in result summary. Querying the HitHighlightedSummary column using FullTextSqlQuery returns the data that contains hit highlights that are surrounded with tags like <c0>…</c0>

This hit-highlight can be easily customized in OOB search core result web part by customizing the xsl. If it is a custom web part and using FullTextSqlQuery then we need to write piece of code to format hit-highlights.

public static string FormatHitHighlightedSummary(object text, string highlightedTag)
{
return Regex.Replace(Regex.Replace(text.ToString(), @"<c\d>", string.Format("<{0}>", highlightedTag), RegexOptions.IgnoreCase), @"</c\d>", string.Format("</{0}>", highlightedTag), RegexOptions.IgnoreCase);
}


While binding the Highlighted Summary, use the above created method as shown below
<%# FormatHitHighlightedSummary(Eval("HitHighlightedSummary"), "i")%>

I’ve used “Italics - <i>” to Highlight the search text… Use this method to format highlighted summary depends on your requirement.

Wednesday, July 29, 2009

SharePoint Custom Page Layout – Web Parts getting added twice

I have used SharePoint Designer to create a custom page layout and added few custom web parts (drag-drop using SPD).

The Page Layout has been deployed using a Feature. After deployment, The Page Layout has web parts as expected and the issue is, when a page is created using the custom Page Layout, each web part is added twice.

I have tried different approaches to remove the web parts unsuccessfully. Finally removed all web parts (which I have added using SharePoint Designer) and used “
AllUsersWebPart” element to add custom web parts in Feature. It worked like a charm!

Monday, July 27, 2009

Useful Tools for SharePoint

The following are the tools which are very frequently used in SharePoint Projects.

SharePoint Designer

SharePoint Designer is a WYSIWYG HTML editor and web design application from Microsoft exclusively for SharePoint sites.

Download link: http://www.microsoft.com/DOWNLOADS/details.aspx?FamilyID=baa3ad86-bfc1-4bd4-9812-d9e710d44f42&displaylang=en

U2U CAML Builder

A tool for creating and executing CAML queries

Download link: http://www.u2u.be/res/Tools/CamlQueryBuilder.aspx

SP Dispose Check

A tool for writing safe code using SharePoint Object Model to prevent memory leaks

Download link: http://code.msdn.microsoft.com/SPDisposeCheck

WSPBuilder

A tool for creating SharePoint Solution Package (WSP) WSS 3.0 & MOSS 2007

Download link: http://www.codeplex.com/wspbuilder

STSDEV

A tool for creating easy deployable solution

Download link: http://www.codeplex.com/stsdev

SharePoint Manager 2007

It a SharePoint object model explorer tool, enables you to browse every site on the local farm and view every property.

Download link: http://www.codeplex.com/spm

WSS/MOSS Log file reader

A tool to View, search and filter SharePoint ULS log files directly from within Central Administration.

Download link: http://www.codeplex.com/wssmosslogfilereader


SharePoint Logging Spy

A tool to allow real time diagnostics of multiple servers in a SharePoint

Download link: http://www.codeplex.com/sharepointloggingspy

SharePoint Test Data Population Tool

A tool for capacity planning and performance testing that populates data for testing SharePoint deployments

Download link: http://www.codeplex.com/sptdatapop

AD Explorer

It is an advanced Active Directory (AD) viewer and editor which allows manipulation of AD objects

Download link: http://technet.microsoft.com/en-us/sysinternals/bb963907.aspx

IE Developer Toolbar

A tool that aims to aid in design and debugging of web pages

Download link: http://www.microsoft.com/downloads/details.aspx?FamilyId=E59C3964-672D-4511-BB3E-2D5E1DB91038&displaylang=en

Note: “Internet Explorer 8” includes the features of IE Developer Toolbar built in, instead of a separate product; known as Developer Tools rather than Developer Toolbar.

Reflector

A tool for disassemble Assemblies

Download link: http://www.red-gate.com/products/reflector

GhostDoc

A tool that helps developers writing XML documentation comments

Download link: http://www.roland-weigelt.de/ghostdoc

Resource Refactoring

A tool to extract hard coded strings from the code to resource files

Download link: http://www.codeplex.com/ResourceRefactoring

Fiddler

It is a Web Debugging Proxy which logs all HTTP(S) traffic between your computer and the Internet.

Download link: http://www.fiddlertool.com/

Saturday, March 28, 2009

SharePoint Excel Services – Session Management

A session will be generated whenever a user views a workbook in browser using Excel Services. The session settings for excel services can be configured in SSP. To configure these settings, navigate to SSP site and click on “Edit Excel Services Settings” from “Excel Services Settings” section.


The default session per user is 25. You can even use “STSADM” command line utility to configure the Excel Services Session management setting.

STSADM.EXE –o set-ecssessionmanagement –ssp mysharedservice
-maxsessionperuser 40

This will increase the session per user to 40.

Friday, March 27, 2009

Excel Web Access - Unable to Load Workbook

The Excel web access will throw the following error when the associated workbook is created using Office Excel 2003 / lower.


Error:
The workbook that you selected cannot be opened.
The workbook may be in an unsupported file format, or it may be corrupt.


Use Office Excel 2007 to create the workbook and save it to your library (trusted location) and now the Excel Web Access web part will display the workbook.

Saturday, February 28, 2009

Site Aggregator Web Part of SharePoint

Site Aggregator is a simple and straight-forward web part, can be used to display sites (specific page in a site) of our choice.

The following are the important properties of Site Aggregator WebPart.

Properties of Site Aggregator

1. Number of characters before ellipses
Sets the number of characters that should be rendered in a tab before truncating and showing ellipses

Default value of this property is 30


2. Number of tabs to show before more dropdown
Sets the number of tabs that should be rendered before additional items are put in the more dropdown

Default value of this property is 5

3. URL
This URL fragment will be appended to the site URL when a tab is selected

Default value of this property is MyInfo.aspx (_layouts/MyInfo.aspx).

I have used “Site Content and Structure” page (_layouts/sitemanager.aspx) page. This will help managers to easily navigate and review “Pending Approvals” or other task of all sites from a same page.

Add the “Site Aggregator” to your page and set the Target Audience property to Managers or the respective approver group, so that only managers/approvers can see this web part.


Use “New Site Tab” from Sites menu to create a new Site Tab.


Set the URL property to “_layouts/sitemanager.aspx”. See the below image for the properties of Site Aggregator.


After adding all the sites, select the “Pending Approval” view to see all the approvals which are pending for the selected site.


Managers / Approvers can manage all approvals or view other details in same page.

Saturday, February 21, 2009

Customizing SharePoint Blog Posts Web Part

Description

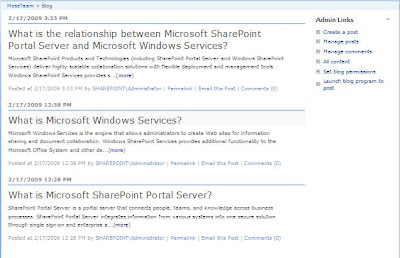
The OOTB posts web part displays complete posts in Home Page (default.aspx) of Blog Site. In this post, the Posts web part is customized to display only 250 characters from each post and a “more” link to the actual blog post instead of displaying complete Blog post in Home Page.

Before Customization

The Posts “ListViewWebPart” displays complete posts in home page.


After Customization

See the below screen, after the customization of Posts Web Part using SharePoint Designer.


Approach

Below the approach followed to display 250 characters blog post summary.

1) Convert Posts web part to XSD Data View using SharePoint Designer (SPD)
2) customize the XSL to display 250 characters summary and a “more” link to the actual blog post
3) Create a new Web Part from Customized Post web part and use it in other blog site

The following explains in-detail about the approach.
Creating XSD Data View

Use SharePoint Designer to convert the default list view web part (Posts) to XSD Data View. Open the Blog’s Home Page in your SharePoint Designer. Once the page is opened Right Click the List View Posts web part and select “Convert to XSD Data View”. See the below screen.
Customizing the XSD Data View

The Body column of the Posts list holds the complete summary text. The DataFormWebPart generated by SPD points the list by using the ListID. ListID is nothing but the GUID, which will change server to server. so use ListName instead of ListID to use this web part in blog site of any server.

Parameters Generated by SPD

After Change


The “removeHtmlTags” template of XSL used to strip the HTML text from the summary text. See the below screens which shows the XSL customizations.

removeHtmlTags” Template Definition

Call “removeHtmlTags” for getting Pure Text

Replace the following section


by


Now the customizations have been done. Export posts web part and use it in other Blog sites by uploading it to Web Part Gallery.


Tuesday, February 17, 2009

Scheduling Periodic/Delayed SharePoint-STSADM Backup using Windows Task Scheduler

STSADM can be used effectively with Windows Task Scheduler to schedule periodic/delayed backups.

STSADM

STSADM is the powerful built-in command line tool to backup/restore a SharePoint server farm or web application or site collection or a database. This tool has very simple, faster and easy to use commands for backup/restore SharePoint data.

STSADM backup syntax

For site collection backup

stsadm -o backup
-url
-filename
[-overwrite]


For catastrophic backup

stsadm -o backup
-directory
-backupmethod
[-item]
[-percentage]
[-backupthreads]
[-showtree]
[-quiet]

Please refer the following to get more details about the backup syntax
http://technet.microsoft.com/en-us/library/cc263441.aspx


Locking Site

Backup process will take longer time for large site collections. If any changes made to the site collection during the backup process, the backup can become corrupted. The preferred approach would be locking the site collection using Setsitelock command of STSADM till the backup process complete. Once the backup process completes, reset the site collection to its default state.

Please refer the following for more information on Setsitelock
http://technet.microsoft.com/en-us/library/cc262811.aspx

To get the current access level of the site
stsadm -o getsitelock -url <URL of Site Collection>

To lock the site/changing the site to read-only.
stsadm -o setsitelock -url <URL of Site Collection> -lock readonly

The following steps needs to be done for scheduling a periodic/delayed backup.

Batch File

Create a batch file, use Notepad to enter the below script and save as “Backup_Script.bat”.
This script creates daily backup of a site collection. A new backup file will be created each day and the file name is auto generated concatenating the current system date.

The script does the following

1) Determine the lock status
2) Locks the site collection
3) Creates a file name using current date
4) Creates backup
5) Unlock the site collection


Backup Script

@echo off
@echo --------------------------------------------------------
@echo backing up site collection <URL of Site Collection>
@echo --------------------------------------------------------
cd \Program Files\Common Files\Microsoft Shared\web server extensions\12\BIN
@echo locking site collection before the backup process starts
@echo off
stsadm -o getsitelock -url <URL of Site Collection>
stsadm -o setsitelock -url <URL of Site Collection> -lock readonly
@echo Site locked

@Echo Generating File Name using current date
@For /F "tokens=1,2,3 delims=/ " %%A in ('Date /t') do @(
Set Day=%%A
Set Month=%%B
Set Year=%%C
Set All=%%C%%B%%A
)

@echo off
stsadm -o backup -url <URL of Site Collection> -filename "C:\Backup\Backup_%All%.bak"
@echo backup completed
@echo off
stsadm -o setsitelock -url <URL of Site Collection> -lock none
@echo Site lock removed

Note: Replace “<URL of Site Collection>” with your site collection URL. Also I’ve used a folder named “C:\Backup” change it to your respective folder.Windows Scheduled Tasks

Create a new Windows Scheduled Task by navigating Start -> Control Panel -> Scheduled Tasks -> Add Scheduled Task. The following screen shows the Windows Scheduled Task Wizard.


Click the Browse button and select the backup batch file (Backup_Script.bat). Click on Next to schedule the backup. The screen below shows the available options for scheduling a task.


Select the convenient time to take the backup. It is better to choose low traffic hours for backing up a site.


Once the time schedule has been selected, click on Next and supply the credentials to run the task.


The account which is used for executing the task should have the Administrative permission. Click Finish to complete the wizard. Now a daily backup has been scheduled, the Task Scheduler will execute the batch file daily at specified time.

Saturday, January 10, 2009

Site templates not available in SharePoint Publishing Site

Many of us would have seen this question in communities. When you create a sub-site from publishing root site, by default the site template list will show “Publishing site with workflow” template.


It doesn’t mean that you can create only publishing site within a publishing root site. To add other site templates, navigate to Site Actions --> Site Settings --> Modify All Site Settings. Click on “Page layouts and site templates” from “Look and Feel” section.


Add whatever site templates you are interested in to create sub-sites from publishing site. I have added a “Blog” template.


Now navigate to Site Actions --> Site Settings --> Create Site, notice that the newly added site template is available for you.


Hope this will be helpful to someone.

Friday, January 2, 2009

Programmatically adding web part to a SharePoint page from web part gallery

I had a requirement to add a web part to default.aspx page from Web part gallery. I have used a Feature to do the same. Please find the code below which is written in “Feature Activated” event.


Feature Activated


Add WebPart


Get WebPart XML


Hope the code is straightforward to understand.

Thursday, January 1, 2009

SharePoint Feature to add site columns

This post explains adding new site column to a SharePoint site. The following simple steps needs to be done to add site columns to a site collection.

1) Identify the Fields (Site Columns), type and its properties. Each Field will have properties like ID(GUID), Display Name, Required, etc.

2) Create a XML file for adding the column information. Ex. “SiteColumns.xml” - This file holds the metadata information related to site columns (Fields). This file information used in
<ElementManifests> section of FEATURE.xml.

3) Create a FEATURE to add these site columns to a site collection.
See the following sample screens to get the better understanding

SiteColumns.xml

<Elements xmlns="http://schemas.microsoft.com/sharepoint/">
<Field Type="HTML"
DisplayName="About"
RichText="TRUE"
RichTextMode="FullHtml"
Required="FALSE"
Group="Custom Column"
ID="{246C6CAE-D801-11DD-A840-DC8E55D89593}"
StaticName="About"
Name="About" />


<Field Type="Image"
DisplayName="AboutImage"
RichText="TRUE"
RichTextMode="FullHtml"
Required="FALSE"
Group="Custom Column"
ID="{304952EE-D801-11DD-9B55-0C8F55D89593}"
StaticName="AboutImage"
Name="AboutImage" />
</Elements>


FEATURE.xml


<Feature Id="873CDC1A-D801-11DD-B399-959255D89593"
Title="Add Site Columns Feature"
Description="This Feature adds Site Columns"
Scope="Site"
Hidden="False"
xmlns="http://schemas.microsoft.com/sharepoint/">
<ElementManifests>
<ElementManifest Location="SiteColumns.xml"/>
</ElementManifests>
</Feature>


This post will also be helpful for the newbie’s to understand about Feature in SharePoint.